Showing posts with label Little Yellow Bicycle. Show all posts

Wednesday, 6 October 2010

Classes back next week! Thursday the 14th and Friday the 15th Of October


To Grunge or not to grunge- Thursday the 14th of October

  by Beverley


Thursday the 14th of October - To Grunge or not to grunge!


Get crafty with paper, Tim Holtz dies and paper rolling. You can create it as I have or I can show you how to grunge it up if you prefer.  This layout can be for three 6 X 4 photos that can be cropped.  Places are strictly limited so book early. The class costs $15 plus cost of the product. Please bring a basic kit including adhesives , craft mat, trimmer, scissors, ruler and fine cutting tool if you have one.

Flower power - Friday the 15th of October

By Beverley

Friday the 15th of October - FLOWER POWER


Get crafty with spellbinders, flowers and Kindy Glitz.  This layout can be for three 6x 4 photos and can be adjusted to fit more or less.  Places are strictly limited so book early. The class costs $15 plus cost of the product. Please bring a basic kit including adhesives , craft mat, trimmer, scissors, ruler and fine cutting tool if you have one.

Secure your place in these  classes by phoning  09 415 0040

Or email customerservice@scottiecrafts.co.nz

Have fun crafting…..  Adrienne, Ann ,Wendy and Beverley

Thursday, 26 August 2010

Vintage Travel Thursday Class


Hi there Crafters

Thursday 2nd of September morning classes (10am – noon)

**Vintage Travel with Beverley**


Beverley Cunningham is your tutor.


Have fun creating a layout using versatile papers from the "Pack your Bags"  range by Little Yellow Bicycle along with cuttlebug , tearing and embossing techniques.  This layout is great for your Travel photos as well as boy photos and can easily be adapted to a girl layout with the addition of some flowers from the shop.  Please bring your basic kit including your cutting mat, fine cutting tool and some dimensional dots. This layout includes two  six by four  photos one of which will be cut into an oval shape.

Bev’s classes have been enjoyed by everyone there….So phone or email soon to book your seat..!!

Cost is $15 for the class plus some product Book soon by phoning 415 0040

Or email customerservice@scottiecrafts.co.nz

Have fun crafting….. Adrienne, Ann and Wendy & Beverley


Monday, 14 June 2010

Sweet...By Ann

Hi again,

[caption id="attachment_275" align="aligncenter" width="298" caption="Sweet by Ann McLachlan"][/caption]


My second layout uses Pink bling as a base and I have used the Martha Stewart Lace Doiley punch around the sides of  the Free Spirit - Pink Geo paper and finished off my "frame" with glass beads.

Strips of  Daisy Days paper have been added along with some spotted lace.

I embossed some pink vellum using the Cuttlebug Deb Devine embossing folder and cut flowers from the Daisy Days paper which I scattered around the page along with the Green Tara flowers and some  Dress it up buttons and finished off the page with Cardstock Stickers and a Journal Block.

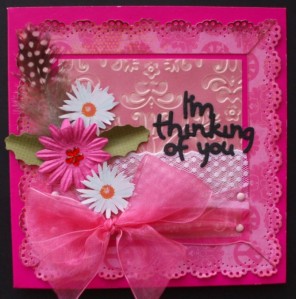
I wanted to do something with the left overs from my layout so i made a card to match my page, this is a great way to use up those bits and pieces you have laying around.

Here's what I came up with...

[caption id="attachment_276" align="aligncenter" width="296" caption="Thinking of you-Ann McLachlan"][/caption]


That's it from me for this month, I hope you have enjoyed the creations and inspiration from our Design Team.

:-) - Ann

Saturday, 12 June 2010

Growing Up... By Michelle

I had a pizza box land on my door step on Friday from Scottie Crafts and wow, what an amazing array of goodies.

I’ve got the new Cuttlebug embossing folder ‘Scrollwork’ to play with and it just had to come out of its packet ... Just. About. Right. Away.


On the base of my layout you can see Orange Bazzill cardstock, inked around the edge. I’ve cut out a square section from the middle and put it aside to use elsewhere on my layout and then I’ve used Bo Bunny double sided paper on top of the orange and inked black around the edges.

I’ve grabbed another piece of cut-off Bo Bunny paper and flipped it and put it through the Cuttlebug using my new embossing folder. Sometimes when you use an embossing folder, totally depending on the thickness of the cardstock or paper you use, it may lift some of the colour and I have absolutely no problem when it decides to do that, it gives another effect.

In this case though, I grabbed a piece of sandpaper and sanded gently along the edge and a little more into the scroll work and then inked lightly over the top of it.

I’ve cut away a corner from my LYB paper - Loose Leaf, which was also double sided, I’ve water edged and curled, distressed and then inked the rolled back edge to add another layer and dimension to my layout.

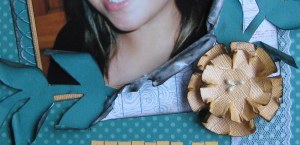
I’ve used a piece of chipboard as the template for my leaves – note that this is the reverse side of the Bo Bunny paper – one side is dotted and the other side a plain green [truly, there is nothing plain about it ... it’s a gorgeous rich emerald colour] ... I’ve used my paper piercer and water pen to gently roll the edges of the leaves back and then I’ve inked them – again in black.


I’ve used a round circle punch to make the handmade flower embellishment, two different sized punches for the layering. I’ve then distressed, ripped and inked the edges and threaded some flower stamens through the middle.

A piece of lace and a couple of staples and I’ve added some MLS alphas ... the colour was quite simply perfect and there you have it. I think that my niece and my sister are going to absolutely adore this layout.

The girls at Scottie Crafts have all the scrapping goodies on hand and will be able to point you in the right direction.

Happy creating... Michelle

Thursday, 10 June 2010

All Smiles...By Ann

Just a quick post before I jet off to Brisbane to attend the Papercraft Expo...
This month the design team are all working with the same Little Yellow Bicycle papers/cardstock and a variation of the same embellishments with a different Cuttlebug product.
We thought you might like to see the different ways you can scrap the same papers.
For my first layout i used a Martha Stewart  Iron Gate punch on the outside of the purple cardstock and used the Little Yellow Bicycle - Free Spirit- Stripe paper as a background.


[caption id="attachment_269" align="aligncenter" width="300" caption="All Smiles - Ann McLachlan"][/caption]


I mounted photos on the orange Bling cardstock and used spiced marmalade distress ink on all of the paper and embellishments.

The Pink Geo paper has been punched with the Lace Doiley punch.

Add some journalling blocks from the Free Spirit- Journal Tablet and some  Cardstock Stickers.

I finished the layout with some Green Tara flowers which i embossed with the Cuttlebug  Deb Devine embossing folder and inked with the distress ink.

Check back soon for another layout and a matching card.

:-)  - Ann


Tuesday, 8 June 2010

Little Yellow Bicycle ... By Sarah

This month for my Scottie Crafts design team projects I got these bright, bright papers from Little Yellow Bicycle to play with. now it is no secret that I love bright colours and I had so much fun playing with these.


My first layout  features a photo that I have had in my 'to scrap' box for over a year,I have been waiting for the perfect papers to scrap this sweet silhouette of my husband and little girl at the beach at sunset.

I don't think that I would have thought to use such bright colours for a sepia photo had one of the LYB papers not reminded me of a colourful sunset, I think that it works really well and I am delighted with how the LO turned out.For the flower centres I used micro beads, I filled each centre with dimensional magic and liberally sprinkled the beads into it. It dries clear and adheres the beads perfectly.


My "Simply You" layout features some photos that I took of Sophie after Natalie had curled her hair, She thought that she was the bees knees and I love the proud expression on her face.

I handmade the calendar date card by drawing around an artisan-shaped journaling card and using a calendar stamp, I then edged the card with blue Smooch (pearlised accent ink).


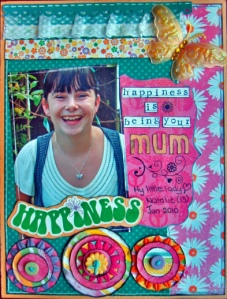
For the  "Happiness"  layout I chose a photo of my daughter Natalie that really seemed to match the beautiful happy colours in the papers. I had fun handmaking the flowers by layering circles of various patterned papers with prima flowers.

I distressed and inked the edges of each circle and completed the look with a bright button for the centre. I made the butterfly using the new cuttlebug 12" border embossing folder.

I embossed a single image onto vellum and cut it out. A little bling and kindyglitz completed the look.

Thanks for looking and have fun creating.   Sarah :)