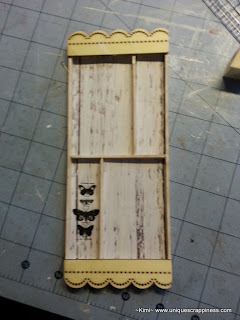
Hello again everybody, today I would like to share with you all not one, but two projects. When I received my design kit, one of the items I was most excited about was the Prima wooden icons. Not just because it was Prima although that alone is pretty awesome, but the little balsa wood tray the icons came in.....I was so excited!! All I could see was a printers tray!! A gorgeous little shabby chic slash vintage printers tray.... did I mention I was excited....I couldn't wait to alter it!!
I first measured the sections and set about working out how and where, I wanted my trays sections to go. With a really sharp blade in my craft knife and the help of some little cutters, I cut away the little dividers that I didn't want.
It now looked something like this. I saved one of the little pieces and re-used it to make my divider. Once I had it all glued in place I gave it all a light coat of gesso. Whilst waiting for the gesso to dry I set about cutting the Kaisercraft Basecoat - Whitewash papers to line the trays with. I adhered these in place with a little white glue. I also added the lacy wooden icon from Prima and a rub-on from the Tim Holtz Idea-Ology Remnant Rubons that came with the kit.
But here are some close ups on the flowers I added - some from my stash and those gorgeous blue/teal ones are from Prima Mini Sachet - Bluejay. A small seam binding bow and another Prima flower along with some bling adorn the bottom corner....just to bring some balance to the project!

I first measured the sections and set about working out how and where, I wanted my trays sections to go. With a really sharp blade in my craft knife and the help of some little cutters, I cut away the little dividers that I didn't want.
It now looked something like this. I saved one of the little pieces and re-used it to make my divider. Once I had it all glued in place I gave it all a light coat of gesso. Whilst waiting for the gesso to dry I set about cutting the Kaisercraft Basecoat - Whitewash papers to line the trays with. I adhered these in place with a little white glue. I also added the lacy wooden icon from Prima and a rub-on from the Tim Holtz Idea-Ology Remnant Rubons that came with the kit.
I thought to myself ... "how cute would this look with some of the actual wood icons as embellishments"....so I set about cutting them too. Then came the really fun part - DECORATING!!!! and I am really sorry guys, I got busy creating and totally forgot to take pics.
But here are some close ups on the flowers I added - some from my stash and those gorgeous blue/teal ones are from Prima Mini Sachet - Bluejay. A small seam binding bow and another Prima flower along with some bling adorn the bottom corner....just to bring some balance to the project!
I have also added some metal charms. The stamp is from Tim Holtz Ideology range and I stamped onto the Bazzill Basics Cardstock - Bazzil White and then layered onto American Crafts Cardstock - Dark Kraft.

Now I know that this is a lengthy post, but I am nearly done. If you remember, I have two projects to share with you today. My second project is an easel card....I have tried to use as much as I could from supplies...so this is an easel card for Fathers Day. I used the spellbinders die that came with the kit to create this little card and as many of the scraps as I could. Again, my apologies for the lack of pictures...but, yes you guessed it I got in the zone again....I do have some pics of the completed project and a list of the supplies I used to make it
Supplies:-
Metal charms.
I just wanted to thank you all for stopping by today and sharing your weekend with me. I also want to thank you for joining me on my journey through my first design team kit...It certainly has been fun....Now to see what the next box has install for me....
Have a scrappy weekend everyone
✿ღ.~♥ Live your Bliss ♥~ღ.✿


Hello Kimi
ReplyDeleteI want one!!! Bev if you are reading this I want one of those wooden boxes.... like now!
Gosh Kimi, this is just gorgeous, I am looking at the pics over and over and salivating dreadfully and added to the flu bug I have as well it is not a pretty sight.
How wonderful to have this in your craft room to look at each day, it would inspire anyone. The eclectic mix of elements that you have chosen to use; flowers, metal, lace, stamps and the pearls, add texture and dimension, the tactile quality oozes, I would love to run my fingers over every section.
Great Art Kimi.
And a great easel card too.
Smiles:)
Sue
Absolutely stunning
ReplyDeleteAwwwwe Sue thank you so much...I couldn't wait to create this!! I saw it in my minds eye straight away. Sorry to hear you have the flu bug, there is nothing worse! I hope you are feeling better soon. Thank you for all your support Sue - I really appreciate your comments :)) Big smiles back ~Kimi~
ReplyDeleteWhat a cool idea with the box! It is really beautiful!! And your card is amazing too!! Love these projects!! :)
ReplyDeleteKimi.... you have outdone yourself yet again. This is an awesome project. You have done a something so very special here.
ReplyDelete